The Retrospective Meeting
A retrospective can be used either by a team or any other group of people. The structure and form of this event will try to motivate all participants to contribute and engage.
1. Triggering a retrospective
There are two possible ways to notify members when you want to start a retrospective event:
Option1: Administration pages Click the "+" in the Retrospective card on the Dashboard. This will open a form to select retrospective members or teams. Option2: Through integrations Using Slack, initiative by typing /retrospective slash command in your channel of choice. Using Microsoft Teams, type @Team O'clock retrospective in your team channel. All participants will be personally notified to join by the Team O'clock bot. When you are done triggering a retrospective, a unique URL is created for that meeting and communicated to participants either via email or directly on a chat channel to join the meeting. You now have the option to set up a recurring retrospective meeting to build your team's agile rituals. Read more about scheduling a meeting.
2. Facilitator and participants
When in the retrospective meeting you have one of the two available roles: Facilitator is a single participant responsible for setting up and driving the meeting.
The facilitator's avatar is marked with a darker border color to be easily identified.
Participants are the team members contributing to the retrospective.
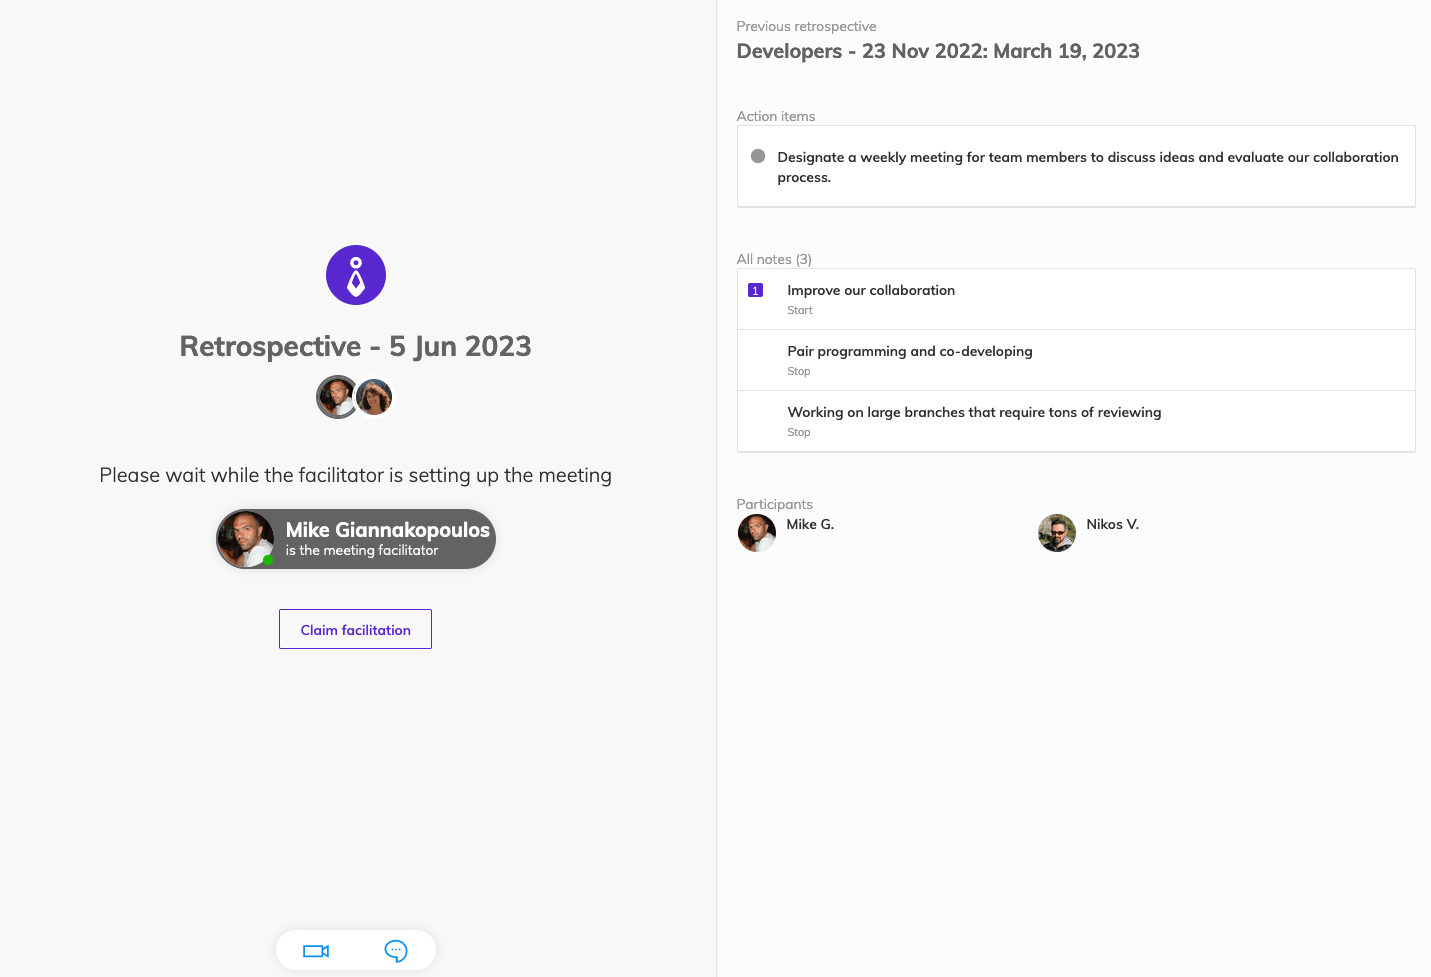
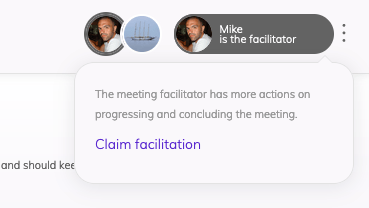
The facilitator role can be claimed by any member participating in the meeting during any time, to ensure that the meeting can proceed in cases where the facilitator might be unavailable or offline. As a participant, you can claim facilitation:
In the starting screen use the Claim facilitation button.
Any time during the meeting, the current facilitator is visible in the top right corner, clicking on the facilitator you can choose to Claim facilitation.
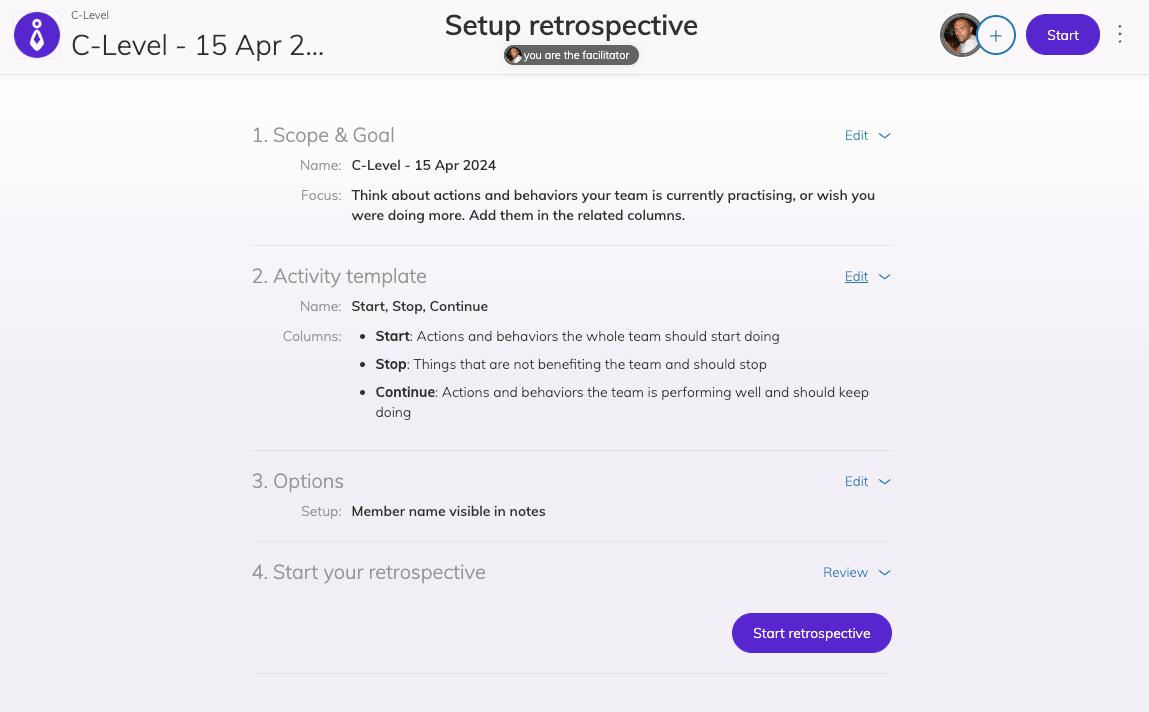
3. Facilitator setting up the retrospective
The facilitator can set up the retrospective using the in-page wizard when in setup mode.
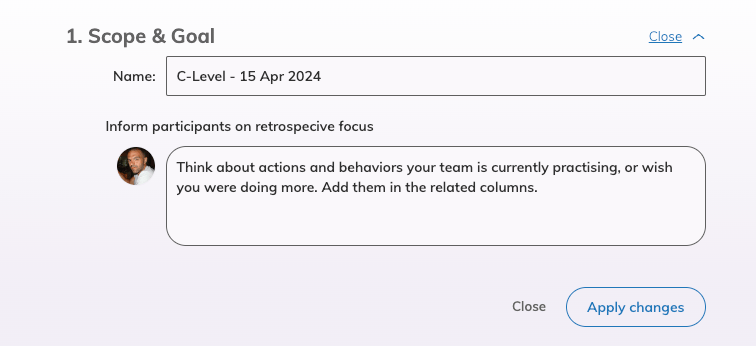
The first step of the in-page wizard is to set up the Scope and goal of the retrospective. The facilitator can click to expand the first step and type the name and focus of the retrospective.
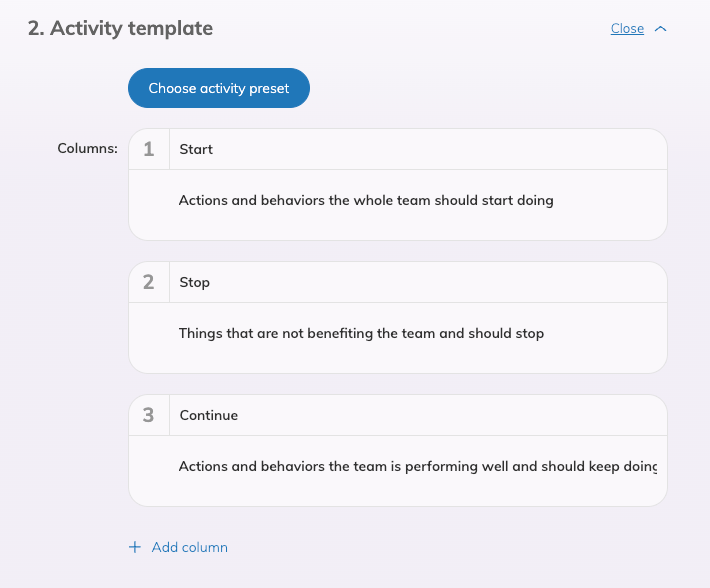
The second step is to customize the retrospective activity. Expanding this step the facilitator can either:
Choose one of the preset activities, by clicking the Choose activity preset option. Navigate the available activities select the one you prefer and click the Apply button to update the retrospective board.
Customize the columns by manually setting column names and descriptions. All custom retrospective activities are automatically stored and are available when you click the Choose activity preset option.
In the third step of the retrospective, the facilitator can choose whether the meeting notes will display the name of the member who added the note or notes will be anonymous.
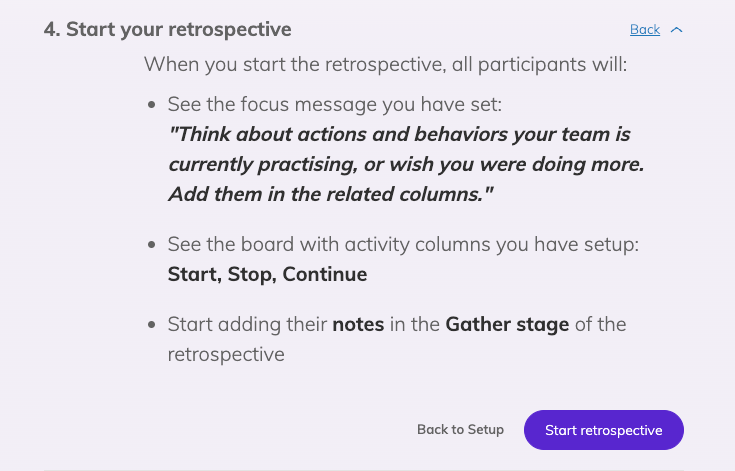
In the final step of the retrospective, the facilitator can see a summary of the whole setup and proceed with starting the retrospective.
While the facilitator is setting up the retrospective, members are on a wait screen, where they are reminded of action items and notes of the previous team retrospective.
4. Facilitator starts the retrospective
When all participants have joined the retrospective page and you are done setting up the retrospective you can click the Start retrospective button at the bottom right of the setup wizard.
5. Communication between the team
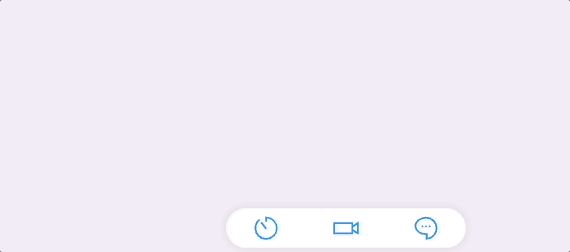
To coordinate with your remote team members you can use the Chat feature to exchange quick messages, located on the bottom right of the retrospective window. To use a video conference with your remotees, add a Video Call URL from the settings next to the Start button. This input is available to all your team members and anyone can set up the Video Call URL. The Video Call URL is always visible in the pill at the bottom and center of the page.
6. During the retrospective
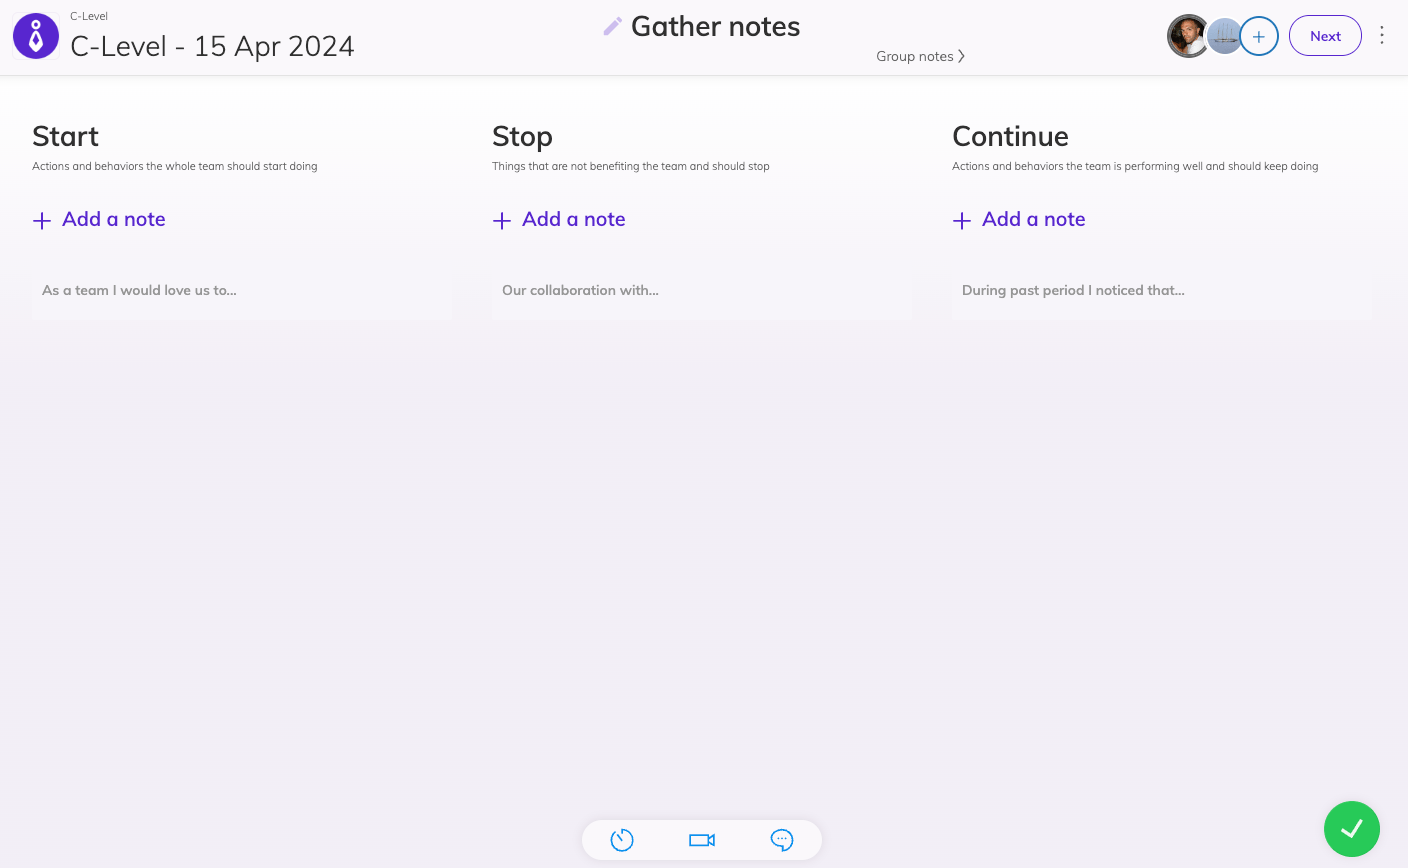
The layout focuses on the board areas where members are adding their notes. Each board area has a title with a description below so that you can understand what notes should be added to that board.
On the header bar, you will always see the current, previous, and next stages of the retrospective. These stages are the guiding mechanism that Team O'clock offers in order to have a fruitful session. All retrospective stages are:
Gather notes, where each participant privately adds notes to the retrospective.
Group notes, where all notes are revealed and the team can edit, group, react, or delete notes. At this stage all unknowns are discussed and clarified.
Vote notes, where each participant can vote on the more important notes.
Discussion & action items to speak more about each note and conclude with some action items that will help participants move forward as a team.
Facilitator actions during the retrospective
The facilitator has some additional actions during the retrospective meeting. The actions only a facilitator can perform are:
Change stage: to move the retrospective meeting to the next or previous stage. This action is accessible from the header area, where the facilitator can click on the previous and next stages displayed below the centered current stage. This action will affect all participants, moving the meeting to the selected stage.
Set stage timer: to define a timer for the current meeting stage. This option is available on the pill at the bottom center of the screen, and the facilitator can set a stage timer in minutes to nudge participants into wrapping up their notes.
To manage a running timer, click on it to view the drop-up with the options and either reset the time or remove the timer altogether. The timer is just a visual hint for the participants to know of the available time and will not automatically proceed to the next stage. The meeting facilitator will need to take that action.
Gather notes stage
This is the starting stage of the retrospective where participants add their notes in private, without being shared with the others to avoid biasing. All participants add their notes in the respecting board area.
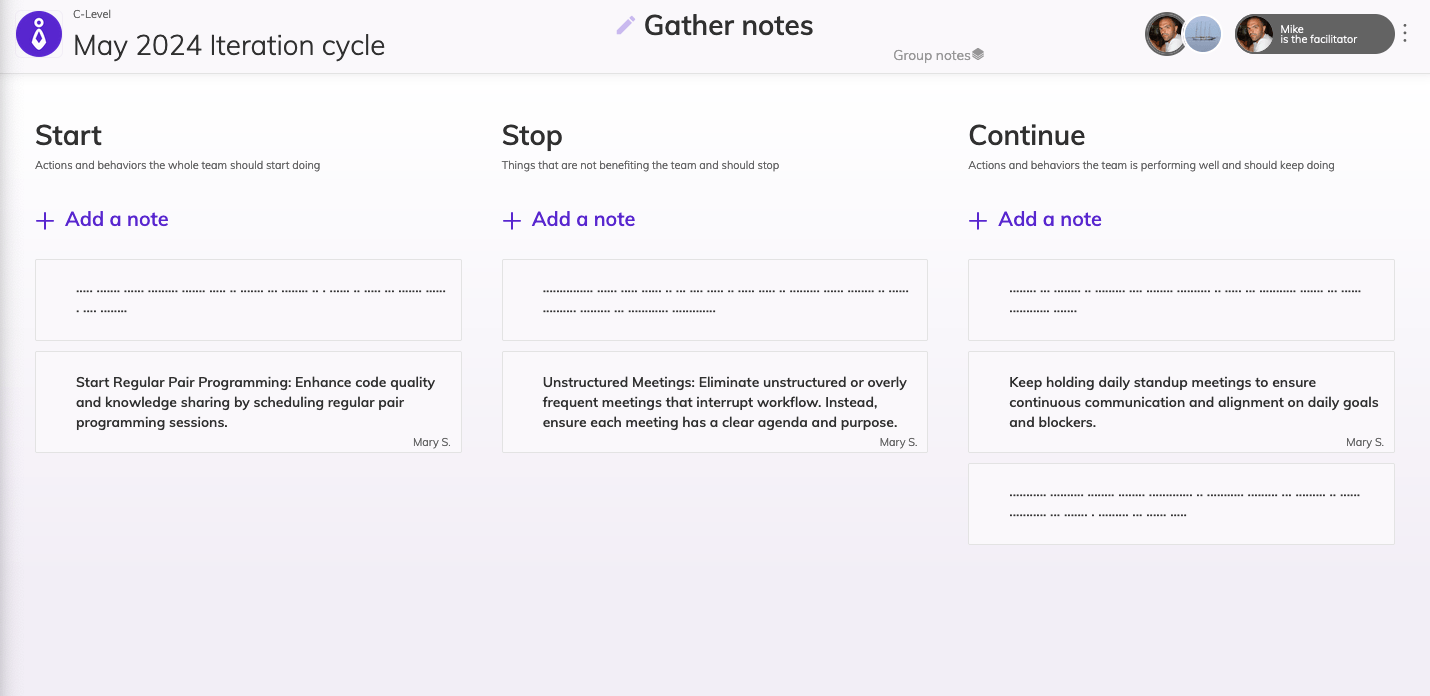
To add a note in a board area click on the the + Add a note link. To move a note to a different board area click and drag the note to drop it in the column of interest. You can edit a note by hovering on the note and clicking the Edit option that appears on the right side of the note. Use this to change board area for a note. Deleting the whole text will remove that note. When you are done adding your notes you can click the I'm done button on the bottom right corner of your screen. This is the way to notify all participants that you are ready to proceed to the next stage. Participants who have clicked I'm done at any stage are marked with a green dot under their avatar. If you are the facilitator of the retrospective once you hit I'm done you will see a new option saying Next stage. This option can drive the meeting forward to the next stage for all participants. As the facilitator, you can alternatively click on the next stage that is visible on the header, below the current stage.
Group notes stage
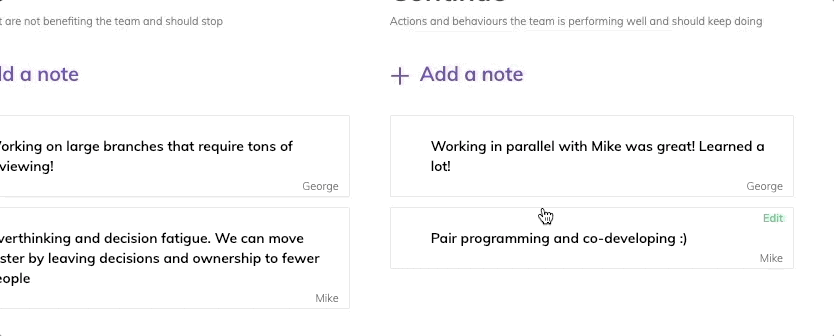
In the grouping stage, all notes are revealed and the team can group similar notes, delete duplicates, and discuss, react to, or edit notes that require more clarification.
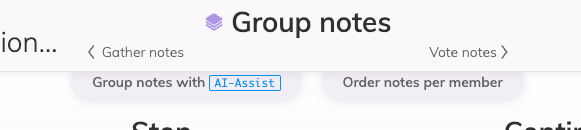
As the facilitator navigates the team into the Group notes stage, there are some extra options to assist the team in this stage:
Order notes per member, to assist in a quick scan or share of the added notes per participant
Automatically group of notes, using AI-Assist to check for similar notes and auto-group them. Auto-grouping works in realtime, so you will see notes being grouped and moved around. Read more about AI-Assist
If member names are displayed under each note, you can quickly distinguish your notes as they are marked with a YOU tag.
To easily view all the notes of a specific team member, use the Order notes per member option.
To group notes drag the duplicate/similar note over the note you want to group it by.
Grouping notes are only allowed in the grouping notes stage. If you are in a following stage and want to change notes grouping, ask the facilitator to navigate back to Group notes.
After this step, everyone should have a clear understanding of the board. Use the Group notes stage to clarify a common understanding across all participants on each note. We strongly suggest that you focus on clarity and avoid debate and discussion over each note before you have voted on the most important items.
Group notes with AI-Assist
The facilitator can use the Group notes with AI-Assist, option to automatically group notes based on the context of each note.
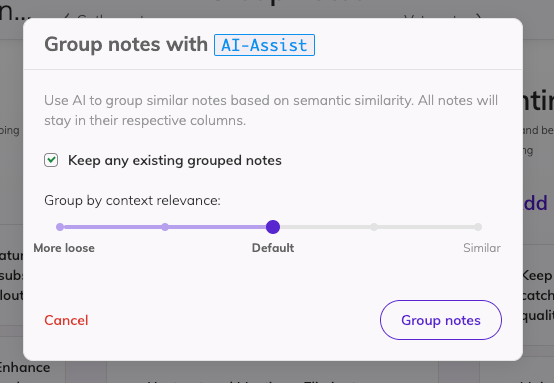
Clicking the button on the center top of the page a modal is visible where the facilitator has options for:
Keeping any notes already grouped in case the team has manually grouped some notes already.
Setting context relevance instructions for grouping notes. The options available are:
More loose, where AI-Assist will match notes based on a broader similarity of context and words.
Default, where the matching is based on the most common settings for context and words.
Similar, where the match between notes should be almost identical.
AI-Assist is based on a generative AI to make the matching so results may vary. Read more on how AI-Assist works.
React to notes
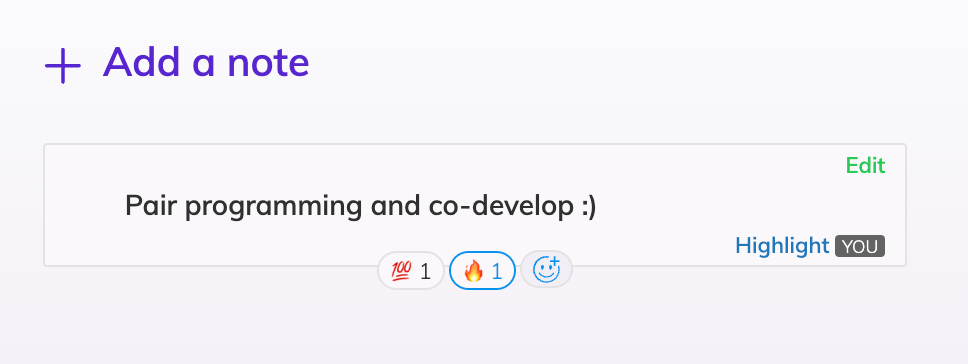
All team members can anonymously react to each note adding emojis. To do so, hover the note of interest and click on the smiley button that appears at the bottom of the note. There you can either choose one of the quick reactions or click on the plus icon to choose across all emojis. A counter next to each emoji showcases the number of reactions.
Emoji's that you have added appear with a blue outline. Clicking on an emoji you have reacted will remove your reaction.
Reactions added during the group stage of retrospective are visible in all respecting stages as well as in the Retrospective Timeline admin page for complete retrospectives.
Highlight notes of a specific member
If the notes are grouped, it is hard to focus on the notes of a specific member. in that case, use the Highlight feature inside every note to blur all other notes and focus on a specific member's notes. Click once more on the same link to Clear the highlight.

Vote notes stage
The main purpose of this step is for participants to vote on the most important notes.
As the facilitator of the meeting, proceeding to the Votes stage you will see a popup with some additional options to set up maximum votes per participant and make votes visible while voting, as seen below.
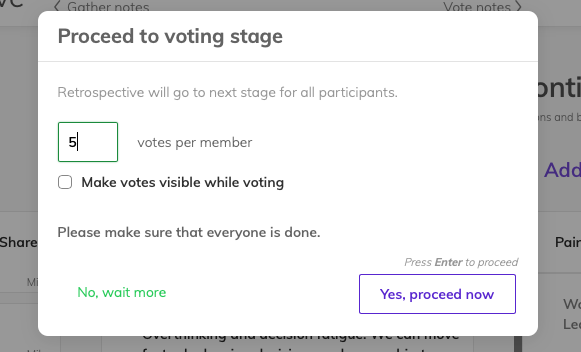
⚠️ Customization of votes is available only for Standard and Enterprise plans.
Each participant can cast a specific number of votes by clicking on the + badge next to each note. To remove a vote, either click on one of the filled-up bars at the top of a note or click the -1 button on the bottom left corner of a voted note.
In a section below the header, participants can see the number of available votes they can cast.
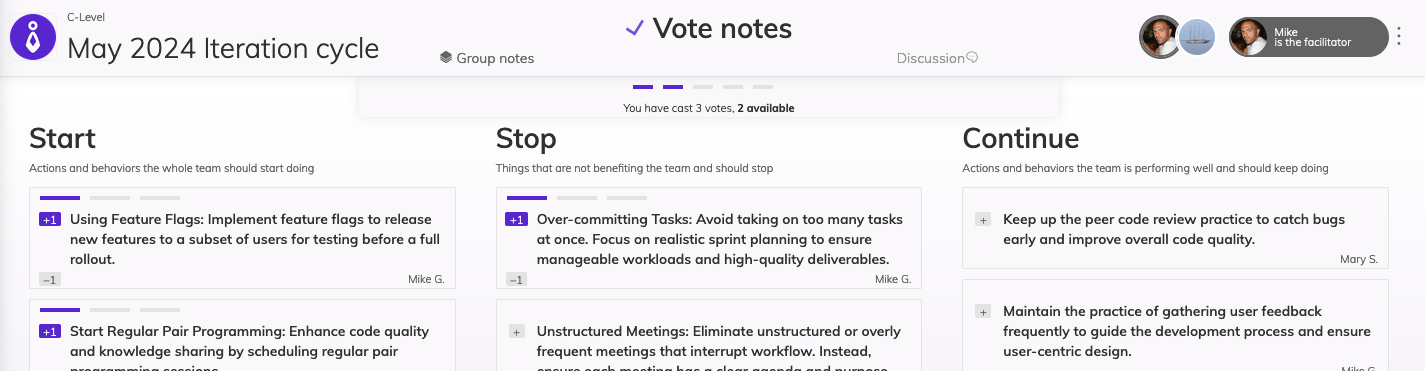
Participants can cast more than one vote on a single item to stress its importance. The voted notes are marked with a different color so that you can instantly tell your votes. To revoke a vote click again on the voted note.
In the case of grouped notes, team members can only vote on the parent note.
At this stage, you can still add and edit notes as the retrospective discussion moves forward.
Discussion & action items stage
This step focuses on exploring actionable items on the voted notes.
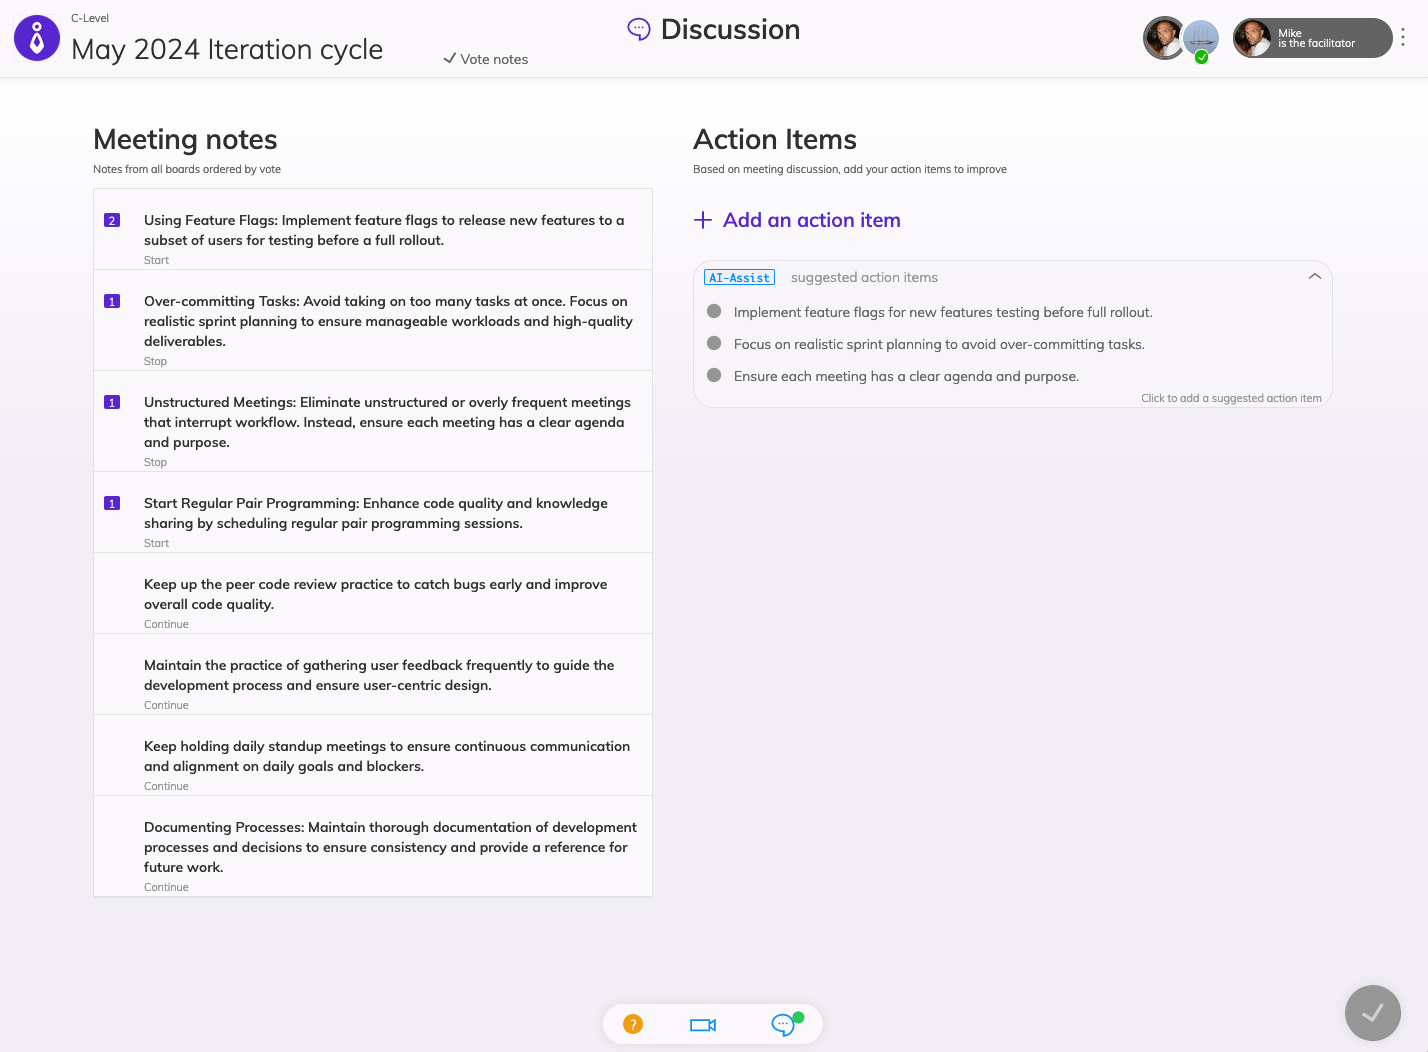
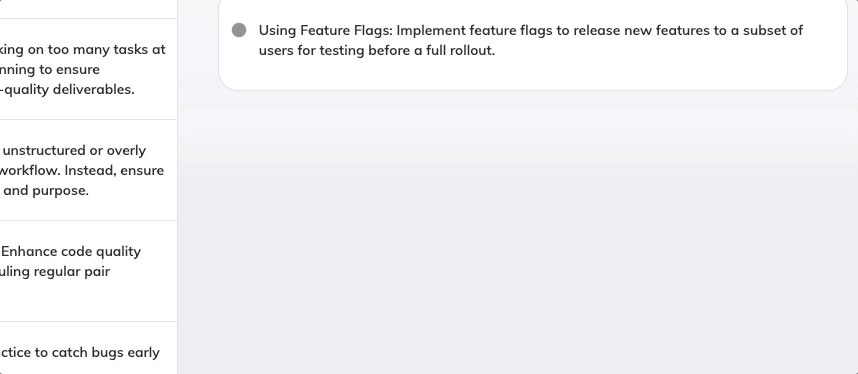
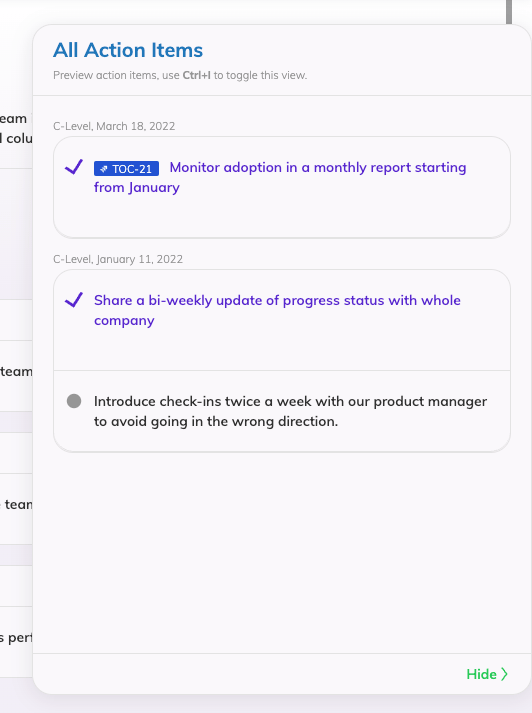
The main area changes again to hold the list of all your notes sorted by votes on one side and an Action items list where you can add your action items and review any action items that are not complete from your previous retrospective meetings.
We suggest reviewing and completing any previously open action items before adding any new ones. Participants will feel positive about the work and actions they have already done before committing to new action items.
If at any point you want to edit or revisit your notes you need to click the Return to Board link.
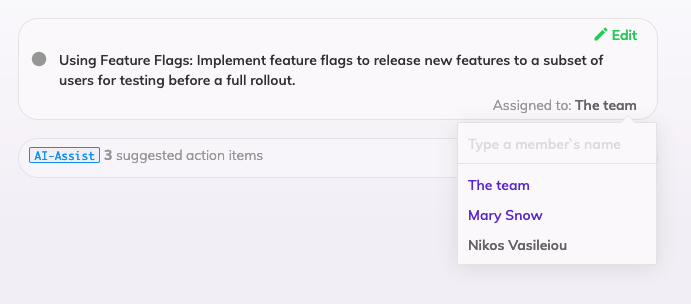
Additionally, you can copy a note to an action item, by hovering the note of interest and clicking the + Add as action item link on the top right corner of each note.

You can also assign a team member responsible for carrying out a specific action item. To do that, hover over an action item you added, and click on the link displayed in the bottom left corner of the action item.
It is recommended to add less than 4 action items, so that participants can focus on taking action and not get intimidated by the number of things that need action.
If you have AI-Assist enabled, you will see some suggestions on possible action items. These suggestions are based on the most voted notes from your retrospective. You can get up to 8 suggestions for your retrospective.
7. Completing the retrospective
When you are done with your action items each participant can click the Finish button to complete the retrospective meeting.
When the meeting finishes, all participants will receive an email containing the decided action items and all the retrospective notes.
With AI-Assist enabled, you will also get a summary of your retrospective in the email and the retrospective analysis on your Timeline.
Action items and integrations
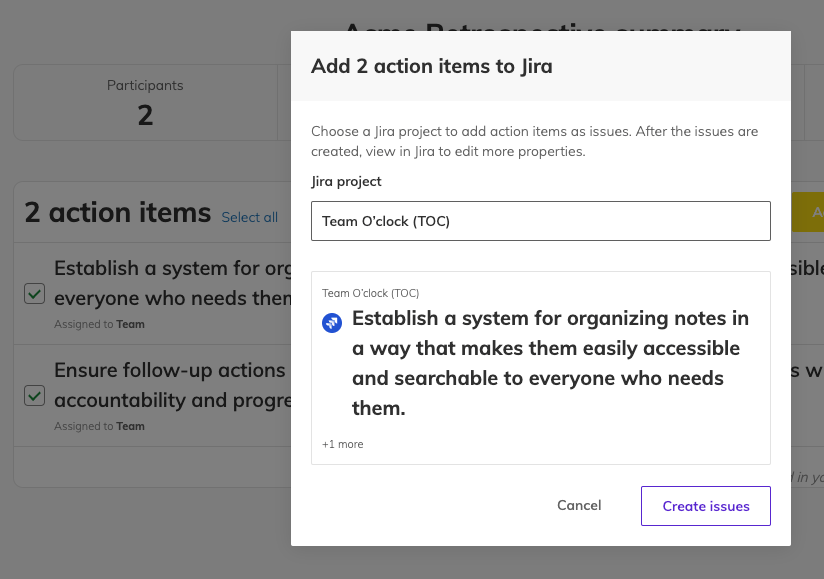
Facilitators can see an extra summary screen when completing the retrospective. This screen is available if you have an active integration that allows you to turn action items into tasks or issues in your third-party service.
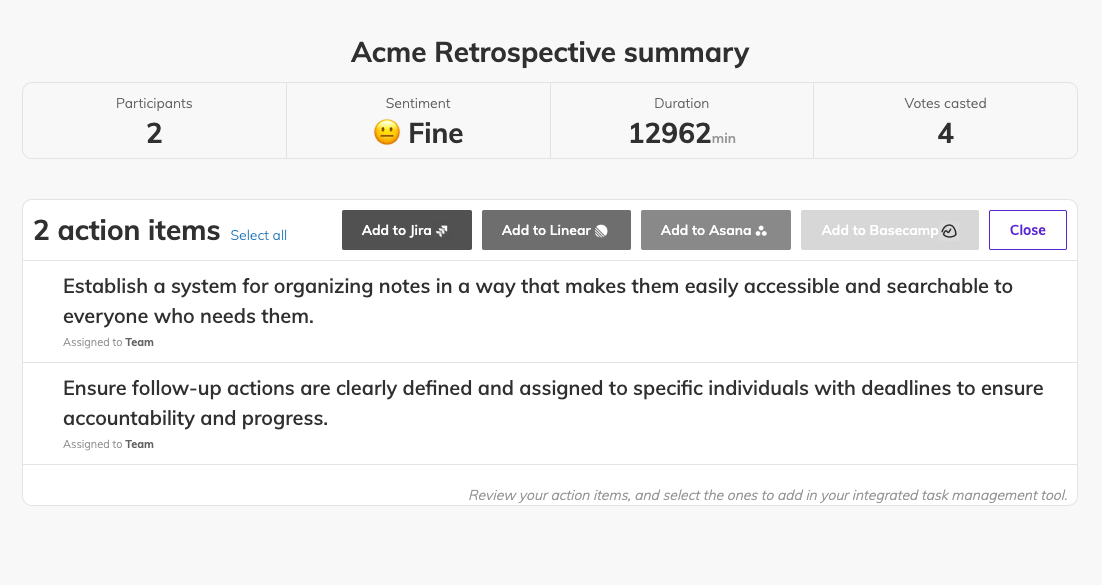
The facilitator can hover an action item and click on the checkbox at the left to select it. Then click on the respecting integration button to import selected action items to the integration of choice.
In case there is no need for an import, click the Close button, located on the right side of the action items card, to exit this view.
8. Restarting the retrospective
In case you are the facilitator and want to restart the meeting you can do so from the options dropdown next to the main action button.
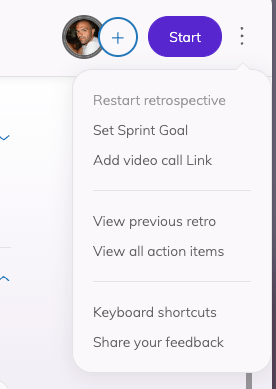
⚠️When a retrospective restarts all previous notes are lost!
Additional options
While in a retrospective meeting, you can also view your team's previous action items using the menu or the keyboard shortcut Ctrl + I.
Previous action items will be displayed as an overlay box hovering from the right of the screen, containing both open and closed action items.
The meeting facilitator can invite more members to the session by clicking the avatar with the "+" icon in the members' list, on the top right of the header section.
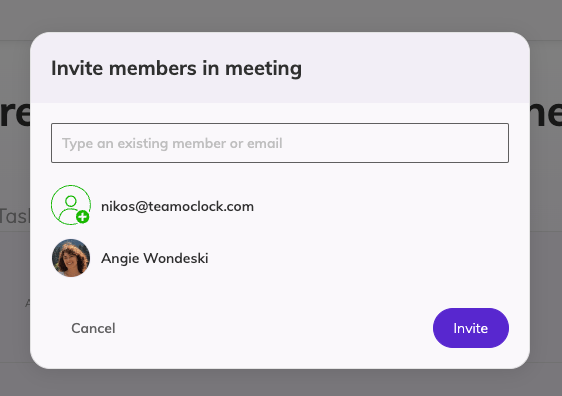
You can either invite a member of your team that has already an account on Team O'clock or invite a colleague via email.
Retrospective expiration
All retrospectives have a default expiration time, measured in days. Expiration days ensure that you and your team don't have a meeting running too long and that you will have a record of the meeting progress even if you haven't completed all the retrospective steps. When Expiration days elapse, the retrospective meeting is automatically completed, and all participants receive an email with all the current action items
Expiration days are days that a retrospective has no activity, so any of the following actions will reset the Expiration days:
Any of the members visiting the retrospective meeting in their browser
Any of the members adding, modifying, or voting a note
The facilitator visits the page and progresses to a different step
Expiration days are a customization option in the team management interface.
Setting or changing video call URL
To use a video conference with your remotees you can setup a Video Call Link from the options dropdown on the left of the main button.
This input is available to all your team members and anyone can setup the Video Call URL. You can type and use any video service you are already using.
To access the setup Video Call URL use the link displayed in the middle on the bottom of the page.